Photoshop Morphing - CrocoFrog
1: Do as your are told in the tutorial - learn something new
- make sure to add your BLOG ADDRESS with the text tool
(watermark it as your own - also worth marks)
- EXPORT as a PNG file and post to your blog
- special attention to NAMING LAYERS
- change the background
- post screenshot of your LAYERS
- Explain how you made it
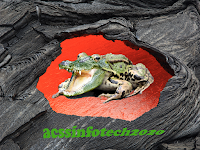 |
| CrocoFrog |
|
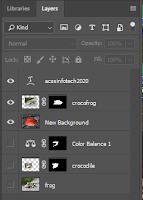 |
| Layers - NOTE - mask layers - new background - hidden originals - watermark |
|
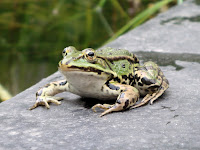 |
| original frog |
|
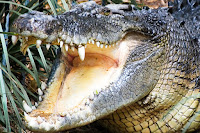 |
| original crocodile |
|
- Explain - in detail - how it was made
- I started with a layer mask on the croc to cut ot the background - refined it with the paint brush (using black)
- I then cloned away the eye and added the frog neck to the croc
- Create an adjustment layer to colour balance the croc head to match the frog body - but erase away the greened mouth and teeth - on the adjustable layer
- bright areas of the frog with the DODGE tool
- burn in extra shadow on the frog layer with the BURN tool
- I duplicated all 3 layers - hid the originals - then merged the copies (merge visible) - rename crocofrog
- Select the crocofrog - selection tool then mask it
- add a new background layer under the crocofrog layer - ctrl-click new layer button
- insert or copy paste in the new background layer
- adjusted the crocofrog size as necessary
- added watermark
|


me like fortitye
ReplyDeletebhAHAHFAHJDFBjklG ANWEGJ GFGFRVB' FNDB.,zd;Gszd fnG.saMN G